

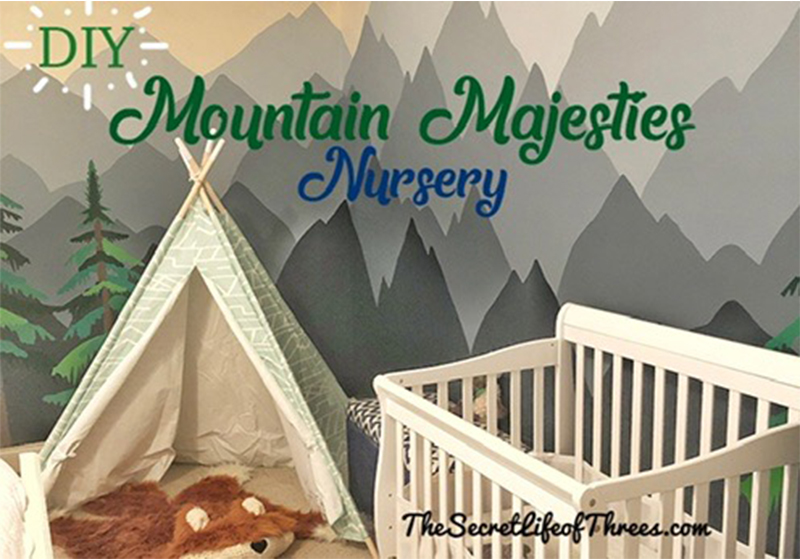
Are you looking to spruce up your kiddo’s bedroom? You’re not crafty? NO PROBLEM! This mountain mural is impossible to mess up, inexpensive, and VERY trendy right now with the woodland themes. It looks great as-is, but there’s so much you can add onto this theme to really make it fun.
I did this in both my boys’ rooms since they both have lots of bear or fox things…so I ran with it! The mountains are each different and each look great. I added tents, their names in decals, vinyl trees, etc.! Soon I plan to add stars and campfires. Whether you decide to leave have a single, simple wall or do a full room, you can’t go wrong. There’s so much you can do!

What you’ll need:
- pencil
- spray bottle of rubbing alcohol and a rag (for erasing)
- ladder
- paint (make sure to get a good quality paint. You do NOT want to have to paint more than one coat on these mountains!)
- paint supplies (including a few small paint brushes
for the small nooks)
Step 1:
Find a paint swatch.
Go to any home improvement store with paint and find a swatch that you like. Swatches make this super easy because they already have several colors that are similar and look well together. They are just variations of the same color. Perfect! Make sure to get at least 4 colors.
I originally did 4 layers of mountains but decided to add a 5th later. For that paint color, I just mixed equal parts of the paint in the layer above and below the new layer to get a good in-between blue for that new layer.
I chose to do the mountains in blues but green colors would look amazing too. If the color swatch you like only has 3 colors, try to find another color or two that meshes well within that swatch. It was a pain in the butt to mix colors later to add layers. The more colors you have, the better the mountains will look. Also, get a color for the sky. I chose a peach color but a more pink color would look great too.
Step 2:
Take a step back and look at the room. Where do you want the mural? This mural will look stunning on one wall or all four! It’s totally up to you! I found that it really looks dynamic if you use at least two walls and put a main focal peak in the corner. Whatever you choose, it will look fantastic!
Step 3:
Start drawing. This is the trickiest part and may involve a lot of rubbing alcohol and erasing until you get it where you like. This is also why it helps to ONLY lightly draw the tip of the peaks until the placement looks good.
The first thing you need to decide is: (See pic 1)
- How high the top mountains will be.
- How high the very bottom mountains will be.

This will all determine the spacing between the layers of mountains. The tighter the spacing between mountain layers, the better. For example, of you make the top mountains almost touch the ceiling and the bottom mountain very short, you will have a ton of ground to cover with the other layers of mountains in between. To do this, make sure the top mountains don’t go too high and the bottom ones are at least waist-high at the peaks. *NOTE: Keep your furniture in mind. If this is a wall that you are putting a dresser or a bed, you can make the bottom layer of mountains much higher. You don’t want to block your beautiful mural!
Once you have chosen the wall or walls, grab a pencil and start at the top. Take a step back and pick where you want the top peaks. Make sure not to put them too close together. They tend to work best if you put around 4-5 ft between the top peaks. Grab your ladder and lightly draw JUST the very tip of the peak. Then take a step back and look again. Move the ladder to where you want the peak next to it and just draw the tip.
Continue drawing the tip of the peaks until you are satisfied with the placement. Once you are, very lightly draw the side of the mountains down until they connect. This will give you a good idea where the next level of peaks should be.
Now that the top layer looks good, start with the peaks on the level of mountains right below that. Place those peaks somewhere in between the top level peaks. (See Pic 4 below of what is looks like when the peaks are a little too uniform). Again, just draw the very tip of the peaks for now. (See Pic 2)

Connect the dots.
Now you can lightly draw the peaks together to distinguish the layers. The more uneven and jagged the lines, the better! I also added lots of little secondary peaks on either side of the main peaks to give them some interest and make them look a little more real.
To make the mountains have depth to them, make sure that some of the peaks go up into another layer above…or two layers above. (See pic 3). The red outlined peaks actually poke up into the mountains 2 layers above. This makes them look grand!

Step 4:
Paint!
This part is a little tedious, but easy. You don’t have to stay inside the lines since mistakes just make it look better!
Keep in mind…
- The more uniform the peaks are, the more fake they look. Mountains are never perfect in shape and placement, so the more random they are, the better! This was the second room I did and made this “mistake”.

Pic 4 - I made these vinyl trees on my Silhouette, but there are plenty you can order from Etsy. They REALLY make the room look complete and really cool!

That’s it!
Bear Cave:
Before:


After:


Fox Den:
Before:


After:


Leave a Reply